
Nutella Cookie in a Cup
by Melissa at No. 2 Pencil
1 tablespoon of butter
1 heaping tablespoon of Nutella
2 rounded and firmly packed tablespoons of dark brown sugar
1/2 teaspoon of unsweetened cocoa powder
1/4 teaspoon of pure vanilla extract
pinch of kosher salt
1 large egg yolk
1/4 cup of all-purpose flour
Start with a microwave safe mug, a tablespoon of butter and one big heaping tablespoon of Nutella.
Melt the butter and Nutella together in the microwave, about thirty seconds. Add two firmly pressed rounded tablespoons of brown sugar, 1/2 teaspoon of unsweetened cocoa powder, a small pinch of kosher salt and 1/4 teaspoon of pure vanilla extract and stir together well.
Then add the yolk from one large egg, and stir again. Do not use the egg white, it makes the cookie gummy and cake like. Add 1/4 cup of all-purpose flour and stir together again.
Cook in microwave for about one minutes. Let cool for about a minute and enjoy!
******************************************************************************************************************************************************************
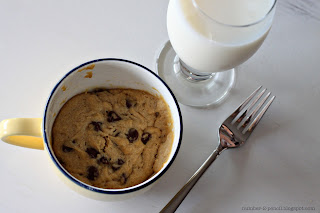
Chocolate Chip Cookie in a Cup
created by Melissa at No. 2 Pencil
1 Tablespoon Butter
1 Tablespoon Granulated White Sugar
1 Tablespoon of firmly packed Dark Brown Sugar
3 Drops of Vanilla Extract
Small Pinch of Kosher Salt
1 Egg Yolk (discard the egg white)
Scant 1/4 of All Purpose Flour
2 Tablespoons of Semi Sweet Chocolate Chips
Start by melting your butter in the microwave. Add sugars, vanilla and salt. Stir to combine. Separate your egg and add the yolk only to your cup. Stir to combine. Add flour, then stir again. Add the chocolate chips, and give a final stir. Cook in microwave 40-60 seconds, start checking for doneness at 40 seconds. Mine takes 50 seconds.
Serve warm.
There you have it, a homemade chocolate chip cookie in just a few minutes...and no mess to clean up.
******************************************************************************************************************************************************************

This is a five minute chocolate mug cake that is laced with peanut butter. It's dangerously easy.
It's topped with a fluffy peanut butter mousse that tastes exactly like peanut butter pie, which takes two seconds to make. Dangerous.
Top that with hot fudge. Very dangerous indeed.
That's the batter in case you were wondering. I don't like my cakes quite that raw.
Chocolate Peanut Butter Mug Cake
2 tablespoons butter
2 tablespoons peanut butter
1/2 teaspoon vanilla
1 egg
2 tablespoons sugar
2 tablespoons flour
3 tablespoons cocoa powder
1/8 teaspoon salt
1/8 teaspoon baking powder
3 tablespoons chocolate chips
Melt the butter in a small dish. Add the peanut butter and mix well.
In the mug, mix together the vanilla, egg, and sugar until well combined. Combine the flour, cocoa, salt, and baking powder and add to the mug. Pour in the peanut butter/butter mixture and mix well. Stir in the chocolate chips. Put in the microwave for 1-2 minutes or until desired doneness is reached (all microwaves are different so you might have to experiment a little. I only do it for about 1 minute). Top with peanut butter pie mousse and hot fudge.
Peanut Butter Pie Mousse
1 tablespoon softened cream cheese
1 tablespoon peanut butter
1/2 teaspoon vanilla
2 tablespoons whipped cream or cool whip
1 tablespoon powdered sugar
Mix together the cream cheese, peanut butter, and vanilla. Fold in the whipped cream. Sift in the powdered sugar (I just used a fork) and fold that in too, trying not to over stir.
*****************************************************************************************************************************************************************

Chocolate Mousse Frosting
(or just chocolate mousse)
■1 can full-fat coconut milk
■1/4 cup plus 1 tbsp cocoa powder
■1/2 tsp pure vanilla extract
■sweetener to taste (Use stevia or powdered sugar for thickest results.)
Open the coconut milk, and leave the can (or transfer to a bowl) uncovered in the fridge overnight, unless it’s already thick like mousse. (Don’t shake the can before opening.) It should get very, very thick. (If it doesn’t, you’ve gotten a bad can that won’t work for the recipe. I highly recommend Thai Kitchen Organic, because I’ve had the most success with that brand.) Once thick, transfer to a bowl (you can opt to leave out the watery bit at the bottom of the can, if you want it even thicker) and whip in your cocoa, vanilla, and sweetener with a fork, or even beaters if you want to be fancy. (For the photos on this page, I didn’t use beaters. But I did pipe the mousse out using an icing tip.) Stored uncovered in the fridge, the mixture gets even thicker.
*******************************************************************************************************************************************************************

Strawberry Frosting Shots
(or strawberry mousse)
■1 can full-fat coconut milk (Perhaps you can sub 1 cup soaked, drained cashews or macadamia nuts if allergic to coconut? If anyone tries, please report back!)
■2-5 strawberries (more will yield a thinner mousse)
■1/4 tsp pure vanilla extract
■sweetener to taste (stevia or powdered sugar)
■tiny pinch salt (trust me)
Open the coconut milk, and if it isn’t yet as thick as in the above photo, leave the can (or transfer to a bowl) uncovered in the fridge overnight. (Don’t shake the can before opening.) It should get very, very thick. (If it doesn’t, you’ve gotten a bad can that won’t work for the recipe. I highly recommend Thai Kitchen Organic.) Once thick, transfer just the thick part to a bowl (leave out the watery bit at the bottom of the can, for a thicker mousse) and blend with all other ingredients. Stored uncovered in the fridge, the mixture gets even thicker.


No comments:
Post a Comment