***********************************************************************************
Copper Tub Lining Tutorial
  |
Pattern Pieces Bottom of liner: Trace around bottom of tub with 1/2" seam allowance and cut out Measure the circumference- mine was about 64" Sides of Liner: 2 pieces- 16" X 32.5" To get this measurement I took the circumference divided in half plus 1/2" for seam allowances. The height is just the depth measurement plus ~3" for seam allowances and hemming. Longer Tabs (sides): 2 pieces- 25.5" X 6.5" Shorter Tabs (ends): 2 pieces- 3.75" X 6.5" Both of these are adjustable- if you want them to be a little shorter you can do less than the 6.5". Both pieces will be folded in half after they are embroidered. Ties: 8 pieces- 1.5" X 10"


 |
EmbroideryThis part is optional- I just wanted a small amount of detail on my liner. The first one I made I did a straight line with 1/2" stitch, 1/2" white. The second one I did a pattern of 1/4" stitch, 1/4" stitch, 1/4" stitch, then 1/2" stitch with 1/4" gap between each stitch. (Does that make sense?) Place the ruler on the edge of the tab and measure 4 inches up- make the pattern you want along the whole length of all 4 tabs. Chose embroidery thread and do a simple backstitch along the pattern you marked out. I put mine in a hoop to make it easier. If you have questions on making a backstitch this blog has a lot of info about embroidery stitches. But basically it is just following the lines.
    |
Once the tabs are embroidered fold them in half lengthwise and press. To Make the Ties- Fold end over 1/4" and press. Fold both edges to meet in the middle and press. Fold in half and press. Sew lengthwise down the tie. Complete this process with all 8 ties.

Now we attach the ties to the tabs- Turn the tabs right side in and pin tabs- unfinished end sticking out so you can see it. You want the tab to be right in the middle up and down. See the little tab sticking out. Sew seams together with tie in it. Do this for both edges on all tabs.

Turn Right side out and press.

Once you are done with your tabs now it is time to work on the liner body- sew both rectangle pieces together with 1/4" seam allowance. Press seams to the side.
I forgot to take a
picture of this, but pin this giant circle of fabric (right sides together) to
the liner bottom- placing two seams at very ends of oval. Sew in place with 1/2
" seam allowance
At this point I
like to check and make sure it fits the tub. Yep- it fits!


Turn top edge of liner over twice towards wrong side so there is no raw edge
showing. Press into place.
Pin tabs into place- right side of tab facing right side of liner. Center small tabs on liner's seams. Once small tabs are pinned in place center longer tabs on long side of liner- with even spaces between each tab.
Pin tabs into place- right side of tab facing right side of liner. Center small tabs on liner's seams. Once small tabs are pinned in place center longer tabs on long side of liner- with even spaces between each tab.

Once all tabs are pinned in place, sew around entire top edge, securing the
tabs and the hems.
Place in tub and tie the ties in bows.
************************************************************************************
Place in tub and tie the ties in bows.
************************************************************************************
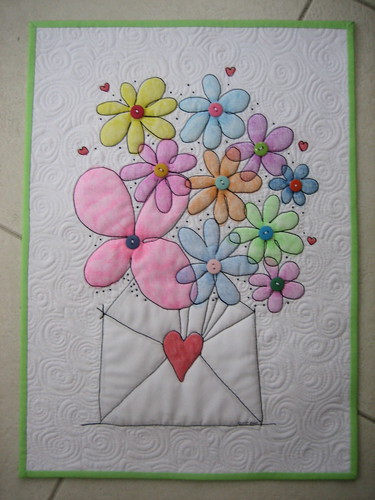
Flowers by Mail
Sometimes it's surprising where we get our inspiration. For me it can come
from anywhere, but this time, I saw a greeting card that was especially
appealing and so I copied it. I've done this before from napkins, wrapping
paper, or even designs on buildings. I named my quilt, "Flowers by Mail" and
you'll see why in a little while. Since I made it, I was informed by a Flickr
friend, that the image was really from a stamp from the Stampin Up company
called, "Send a Celebration". Here is my rendition done on paper the same size
as my quilt will be:
 After
I drew the image, I traced it onto my fabric lightly, with pencil.
After
I drew the image, I traced it onto my fabric lightly, with pencil.
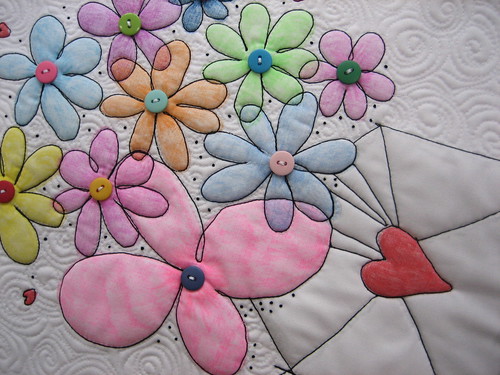
Since the greeting card was done in watercolors, I really wanted to
duplicate that look, and remembered that I had recently read of a method of
coloring with crayons on fabric and setting the wax with an iron to obtain a
watery look. First though, I knew I had to iron a piece of freezer paper to the
back of my fabric for stability so the material didn't bunch as I was coloring.

After I was done coloring and I did make my middles a bit darker for
shadowing, and even used a light gray on the envelope, I removed the freezer
paper, and got a piece of white muslin to put over the quilt top so that I
didn't get wax all over my iron when I was setting the colors. There was a bit
of a trick to that since I remembered reading that you needed to smell the wax
to know when it was done. Don't iron it too much or you will scorch it.
After that, I wanted the flowers and envelope to stand out a bit from my
background quilting so I decided to use trapunto. (Another new technique for
me.) I cut a piece of 100% thin cotton batting bigger than my image and put the
quilt top on top of it, then pinned it around the image with flat head long
pins. Then, in order not to catch any unnecessary extra batting in my initial
stitching, I turned it over and cut on the outside of my pins so that everything
would be smooth.
 Then, I used white thread in the top and bobbin and
free motion stitched around each flower, heart and envelope.
Then, I used white thread in the top and bobbin and
free motion stitched around each flower, heart and envelope.
 And when was done with that, I turned it over and cut
as close as possible around all the stitching. Note the child's scissors with
blunt tip just for safety. I sure didn't want to cut into my top fabric at this
stage.
And when was done with that, I turned it over and cut
as close as possible around all the stitching. Note the child's scissors with
blunt tip just for safety. I sure didn't want to cut into my top fabric at this
stage.
 Then, I sandwiched as usual, using my favorite 505
spray adhesive. I have no picture of that, I'm afraid. Next, I wanted to stitch
around each flower, heart and envelope with black, so again I did something I've
never done.......I used #12 DMC perle cotton. I knew that the thickness would be
perfect to make my flowers pop. Only there was one problem.......first I had to
thread a bobbin with the perle cotton since I have no big thread holder. It
worked perfectly! I used a fine black thread in the bobbin (on the bottom). I
left all my threads hanging as I was sewing each flower, and was careful not to
get them in a different flower's stitching because they were thicker than I had
thought. And when I was done stitching, I buried them by bringing them to the
rear and burying them in the batting.
Then, I sandwiched as usual, using my favorite 505
spray adhesive. I have no picture of that, I'm afraid. Next, I wanted to stitch
around each flower, heart and envelope with black, so again I did something I've
never done.......I used #12 DMC perle cotton. I knew that the thickness would be
perfect to make my flowers pop. Only there was one problem.......first I had to
thread a bobbin with the perle cotton since I have no big thread holder. It
worked perfectly! I used a fine black thread in the bobbin (on the bottom). I
left all my threads hanging as I was sewing each flower, and was careful not to
get them in a different flower's stitching because they were thicker than I had
thought. And when I was done stitching, I buried them by bringing them to the
rear and burying them in the batting.
 Then, I used white thread in the top and bobbin and
free motion stitched around each flower, heart and envelope.
Then, I used white thread in the top and bobbin and
free motion stitched around each flower, heart and envelope. And when was done with that, I turned it over and cut
as close as possible around all the stitching. Note the child's scissors with
blunt tip just for safety. I sure didn't want to cut into my top fabric at this
stage.
And when was done with that, I turned it over and cut
as close as possible around all the stitching. Note the child's scissors with
blunt tip just for safety. I sure didn't want to cut into my top fabric at this
stage.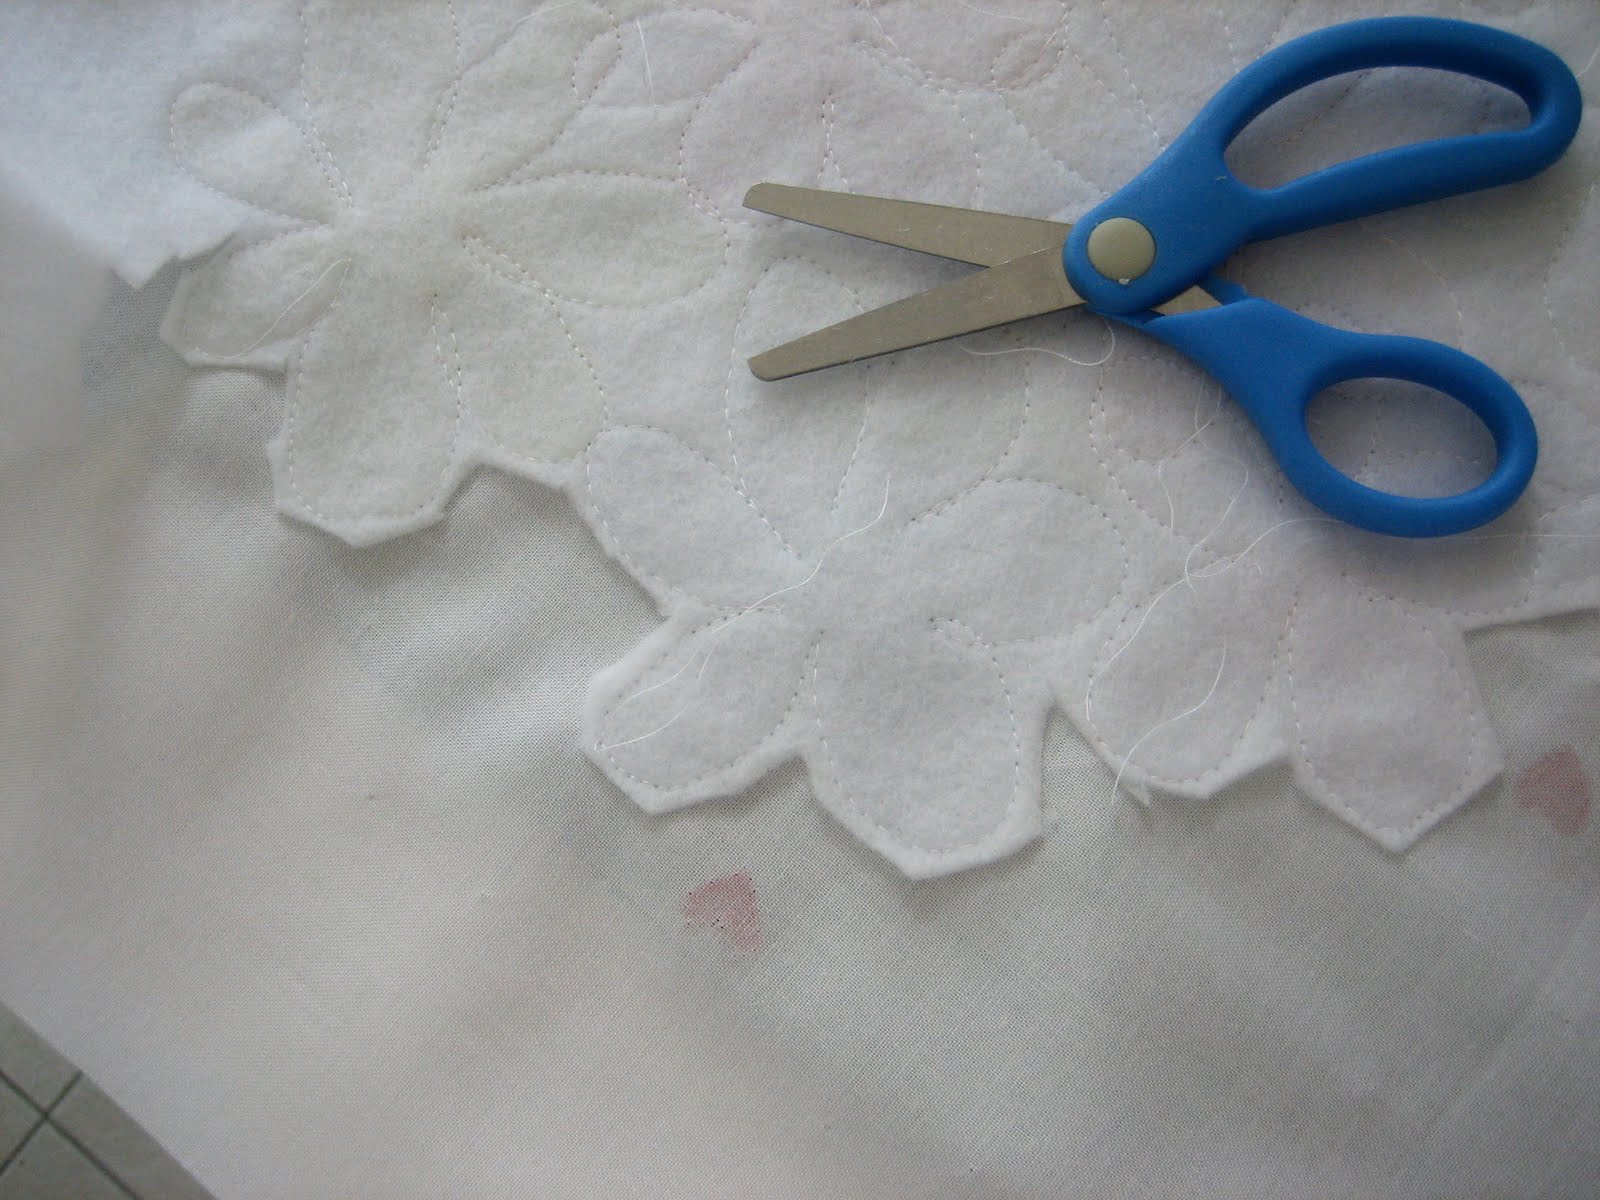 Then, I sandwiched as usual, using my favorite 505
spray adhesive. I have no picture of that, I'm afraid. Next, I wanted to stitch
around each flower, heart and envelope with black, so again I did something I've
never done.......I used #12 DMC perle cotton. I knew that the thickness would be
perfect to make my flowers pop. Only there was one problem.......first I had to
thread a bobbin with the perle cotton since I have no big thread holder. It
worked perfectly! I used a fine black thread in the bobbin (on the bottom). I
left all my threads hanging as I was sewing each flower, and was careful not to
get them in a different flower's stitching because they were thicker than I had
thought. And when I was done stitching, I buried them by bringing them to the
rear and burying them in the batting.
Then, I sandwiched as usual, using my favorite 505
spray adhesive. I have no picture of that, I'm afraid. Next, I wanted to stitch
around each flower, heart and envelope with black, so again I did something I've
never done.......I used #12 DMC perle cotton. I knew that the thickness would be
perfect to make my flowers pop. Only there was one problem.......first I had to
thread a bobbin with the perle cotton since I have no big thread holder. It
worked perfectly! I used a fine black thread in the bobbin (on the bottom). I
left all my threads hanging as I was sewing each flower, and was careful not to
get them in a different flower's stitching because they were thicker than I had
thought. And when I was done stitching, I buried them by bringing them to the
rear and burying them in the batting.
On to the background quilting which I did in my newfound swirls! Oh, so
pretty! Then, I trimmed it, bound it with a solid matching green, and put some
buttons and colonial knots on for whimsey and wa-la:
**********************************************************************************
DIY Embroidery Pattern Printing
Thank you for all of your comments and compliments on my
"scrapple" style stitching. I love to stitch and while I will be the first to
admit that I do not "follow" any rules or techniques on the correct way to
stitch I will also say that I LOVE the way it is coming out with all of the
textures and stitches and I even added some pink in last night
!!?!!whhhaatttt???, I know!

Anyways, I know you can Google "how to transfer an embroidery pattern" but this is how I do it :
Supplies

2. Place the freezer paper SHINY SIDE OF PAPER DOWN and iron the freezer paper onto the muslin. It will pucker a little bit. MAKE SURE THAT ALL EDGES ARE IRONED DOWN COMPLETELY. Trim to measure the 8 1/2" x 11

3. Place your piece into your printer the way you would typically place paper in and print out your image.

4. Remove the freezer paper

5. Attach an embroidery hoop

6. Stitch away!..be careful..it is addicting, well and even a bit harmful if you poke yourself as much as I do!
 I
am almost done with my piece and I will share it when I am!
I
am almost done with my piece and I will share it when I am!
oh, wait..the image...it is right here: http://homegrownhospitality.typepad.com/homegrown_hospitality/2011/12/just-color.html
**********************************************************************************
Anyways, I know you can Google "how to transfer an embroidery pattern" but this is how I do it :
Supplies
- Muslin
- Freezer Paper
- Scissors
- Iron
- Printer
2. Place the freezer paper SHINY SIDE OF PAPER DOWN and iron the freezer paper onto the muslin. It will pucker a little bit. MAKE SURE THAT ALL EDGES ARE IRONED DOWN COMPLETELY. Trim to measure the 8 1/2" x 11
3. Place your piece into your printer the way you would typically place paper in and print out your image.
4. Remove the freezer paper
5. Attach an embroidery hoop
6. Stitch away!..be careful..it is addicting, well and even a bit harmful if you poke yourself as much as I do!
oh, wait..the image...it is right here: http://homegrownhospitality.typepad.com/homegrown_hospitality/2011/12/just-color.html
**********************************************************************************
Tutorial: Freezer Paper Stenciling
Freezer Paper Stenciling is a fast, fun and
easy way to make an outfit more interesting (this could be used on any type of
fabric project, obviously). Okay so what do you need?

And now that you've gathered your supplies, let the adventure begin!
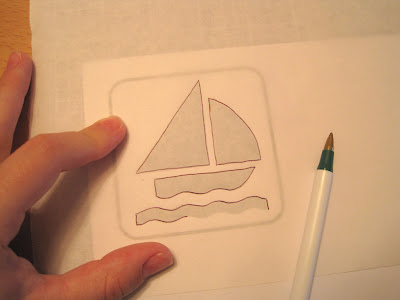
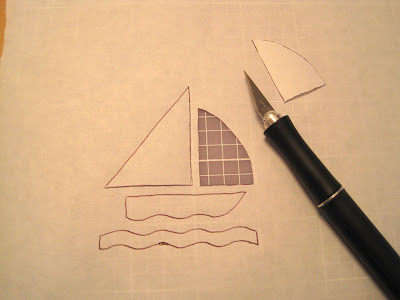
Step 1 Trace the image onto the freezer paper (for those of us who do not print directly on to it) on the DULL side (i.e. not the shiny side)

Step
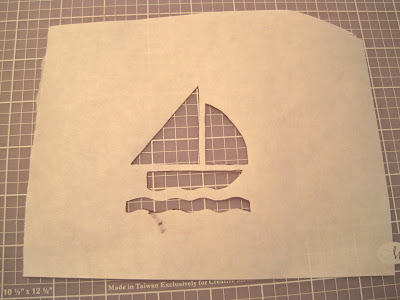
2 Cut the image out using an x-acto knife (or scissors if you can manage
that somehow). Remember that you are making a stencil, so it is sorta like a
negative. The areas that you cut out will get painted, and the areas you don't
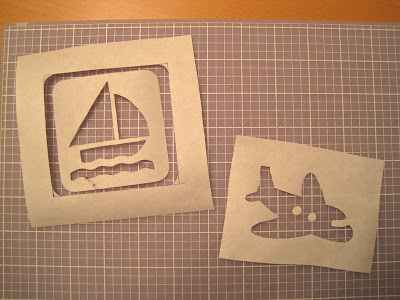
will stay the color of the fabric. (for example if there are pieces within the
image, like airplane windows, cut them out and save them cause you'll iron them
back into the cut out area later). If there are teeny tiny pieces start with the
smallest sections first and then go to the larger ones, it makes it
easier.
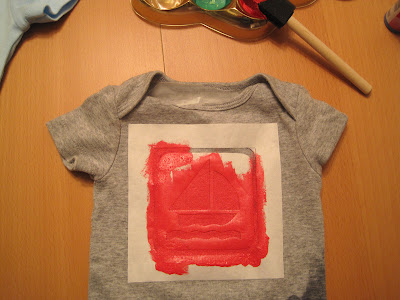
Step 3 Iron the freezer paper to the fabric, shiny side down. Make sure that you iron the edges really well or leaking may occur (which actually happened on the boat, cause I don't think that my iron was fully hot at the time).

Step 4 Put wax paper inbetween the layers of fabric incase the paint bleeds through (especially if you are doing multiple coats of paint.) You can probably use something other than wax paper, it was just the first thing I thought of...
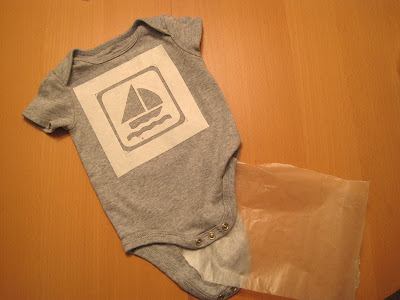
Step 5 Paint, paint, paint. For the boat and plane I did two coats. For the batman onesie awhile back, I did 3 three coats, and the Quincy onesie I did two. I would probably put 2 or 3 hours inbetween coats, of course you can use a hair dryer to speed up the drying, if you are impatient like me. Well to be honest I don't always wait until it is completely dry to add another coat.
Note: One problem I haven't solved yet is how to prevent the paint from cracking a little after many washes, or when it stretches across the Bubb's large tummy after eating. If the fabric won't ever stretch (like on a bag or a regular t-shirt (not onesie), this probably wouldn't be a problem.

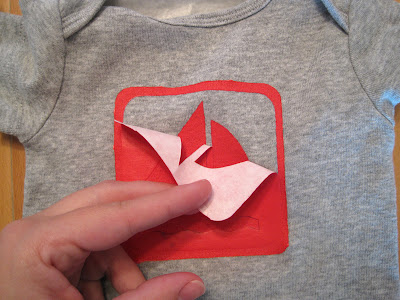
Step 6 This is by far the BEST step. Pulling off the freezer paper. Just lift a corner and begin to peel. The first time I didn't think that it would work, but it totally leaves a nice clean edge, it is awesome. For the little pieces, like the airplane windows, I sorta pinch at the freezer paper and pull it off. For really small pieces, like Quincy's eyes, etc. I used tweezers to help me.
Step 7 Iron over the finished product, with a cloth between the iron and paint, just to help fuse the paint down.
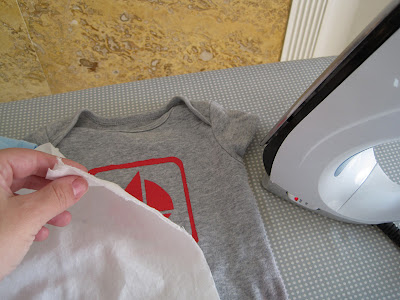

And you're done! Enjoy your newly made items!!

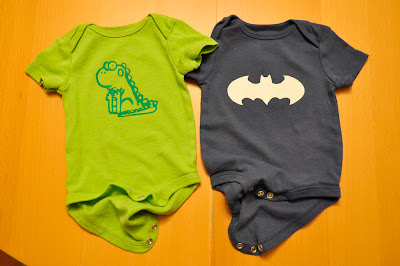

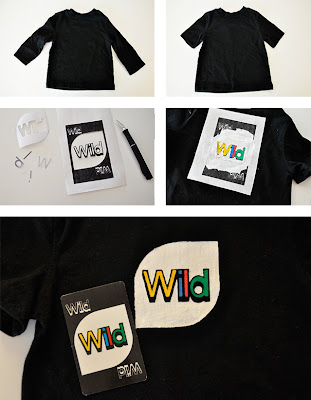
MULTIPLE PAINT COLORS: You can also do Freezer Paper Stenciling with multiple paint colors too although it can be a bit more tricky if it is a small design but it definitely works. I made this shirt for his UNO birthday party. I used the same steps as above except I printed directly onto the freezer paper by cutting the freezer paper to 8.5x11 and then sticking it into the printer to print on the non-shiny side. It was super easy. Then I painted with the different colors and used a foam brush and tiny paint brushes to do the letters. Each color got 2 coats. (And I know I've been complaining about the paint cracking...but it hasn't on this shirt and I think its because it is a shirt and not a onesie made from knits.)
 Tips
To make it last longer, I always wash them inside out. I think that the paint
brand recommends not washing for 72 hours. Also, when painting, I paint/dab in
any direction I feel like to get the majority of the paint on and then I use
downward brush strokes over all of it, to make the paint all seem to be going in
one direction.
Tips
To make it last longer, I always wash them inside out. I think that the paint
brand recommends not washing for 72 hours. Also, when painting, I paint/dab in
any direction I feel like to get the majority of the paint on and then I use
downward brush strokes over all of it, to make the paint all seem to be going in
one direction.
This tutorial has been featured on:
*********************************************************************************

Found this on Pinterest... Pallet - just stain and take out some slats...
**********************************************************************************

1 Freezer Paper (wax paper doesn't work, it
must say "Freezer Paper" on the box. Found at any grocery store)
2 X-acto Knife and Scissors
3 Fabric
4 Iron
2 X-acto Knife and Scissors
3 Fabric
4 Iron
5 Your Image (if you print it onto paper,
you'll have to trace it onto the freezer paper with a writing implement of your
choosing OR you can print directly onto the freezer paper, on the dull side, if
you cut it down to fit your printer)
6 Foam Paint Brushes
7 Fabric Paint (I use Tulip brand, matte.
You can get it at Michaels, JoAnns, etc.)
And now that you've gathered your supplies, let the adventure begin!
Step 1 Trace the image onto the freezer paper (for those of us who do not print directly on to it) on the DULL side (i.e. not the shiny side)


Step 3 Iron the freezer paper to the fabric, shiny side down. Make sure that you iron the edges really well or leaking may occur (which actually happened on the boat, cause I don't think that my iron was fully hot at the time).

Step 4 Put wax paper inbetween the layers of fabric incase the paint bleeds through (especially if you are doing multiple coats of paint.) You can probably use something other than wax paper, it was just the first thing I thought of...

Step 5 Paint, paint, paint. For the boat and plane I did two coats. For the batman onesie awhile back, I did 3 three coats, and the Quincy onesie I did two. I would probably put 2 or 3 hours inbetween coats, of course you can use a hair dryer to speed up the drying, if you are impatient like me. Well to be honest I don't always wait until it is completely dry to add another coat.
Note: One problem I haven't solved yet is how to prevent the paint from cracking a little after many washes, or when it stretches across the Bubb's large tummy after eating. If the fabric won't ever stretch (like on a bag or a regular t-shirt (not onesie), this probably wouldn't be a problem.


Step 6 This is by far the BEST step. Pulling off the freezer paper. Just lift a corner and begin to peel. The first time I didn't think that it would work, but it totally leaves a nice clean edge, it is awesome. For the little pieces, like the airplane windows, I sorta pinch at the freezer paper and pull it off. For really small pieces, like Quincy's eyes, etc. I used tweezers to help me.

Step 7 Iron over the finished product, with a cloth between the iron and paint, just to help fuse the paint down.


And you're done! Enjoy your newly made items!!


MULTIPLE PAINT COLORS: You can also do Freezer Paper Stenciling with multiple paint colors too although it can be a bit more tricky if it is a small design but it definitely works. I made this shirt for his UNO birthday party. I used the same steps as above except I printed directly onto the freezer paper by cutting the freezer paper to 8.5x11 and then sticking it into the printer to print on the non-shiny side. It was super easy. Then I painted with the different colors and used a foam brush and tiny paint brushes to do the letters. Each color got 2 coats. (And I know I've been complaining about the paint cracking...but it hasn't on this shirt and I think its because it is a shirt and not a onesie made from knits.)
Tips
To make it last longer, I always wash them inside out. I think that the paint
brand recommends not washing for 72 hours. Also, when painting, I paint/dab in
any direction I feel like to get the majority of the paint on and then I use
downward brush strokes over all of it, to make the paint all seem to be going in
one direction.This tutorial has been featured on:
*********************************************************************************
Found this on Pinterest... Pallet - just stain and take out some slats...
**********************************************************************************

No comments:
Post a Comment